Installation
Below is the Online Installation Manual, if you would like the down loadable or printable version, click here: Printable Air Tight Hubs Manual.|
NOTE The Universal Kit will eliminate the need to measure your spindle. Air-Tight's Universal kit comes with (3) different inner dimension size shims for the 3500lb. and (1) for the 5200lb and 7000lb. One or none of the shims may be used in putting on the stainless steel bushing. NOTE : Installation of the Air-Tight Bearing Protector should only be undertaken by someone familiar with the process of repacking and installing wheel bearings. Seek professional advice if you have not successfully completed these processes in the past. You may download installation instructions and view installation videos at Here. |
Sport Model Directions With Easy Lube |
Commercial Model Directions With Easy Lube |
Sport Model Directions Without Easy Lube |
Commercial Model Directions Without Easy Lube |
- List of tools
- List of supplies
- Universal Kit Installation
- Disassemble wheel
- Cleaning the axle
- Applying the bonding agent
- Putting on the bushing
- Loosen the Zerk fitting
- Prepare the hub
- Assemble the hub
- Put on adapter ring
- Install Air-Tight Cap
- Allow the bonding agent to fully cure and air up the hub:
- Ready to go!
Tips on the Installation
| 1. List of tools: |
Back To Top |
|
1. Safety glasses 2. Hammer 3. Brass or aluminum punch 4. channel locks 5. 1/2" drive ratchet and sockets (1 1/8 - 1 1/2") 6. Block of wood or plastic 7. grease gun 8. razor knife 9. calipers 10. 6" long, 2" diameter or 1 1/2" diameter pipe 11. drill 12. drill bit #R |
13. tap 1/8" - 27 NPT 14. die grinder + a cut off wheel 15. screw driver 16. seal driver 17. mini sledge hammer 18. blunt chisel 19. 5/16" boxed wrench 20. set of allen wrenches up to 3/8" 21. impact driver 22. hydraulic jack 23. jack stands
Note: This list includes all the tools required to work on
every make of axle. Most jobs require just a few of the tools
listed. |
| 2. List of supplies: |
Back To Top |
- degreaser (lacquer thinner)
- rags or paper towels
- emery cloth
- Teflon tape
- cold galvanized paint
| 3.
Universal Kit Insatallation: |
Back To Top |
Universal Kit Installation (Use for Universal Kit Installation)
The Universal Kit will eliminate the need to measure your spindle. Air-Tight's Universal Kit comes with (3) different inner dimension size shims. One or none of the shims may be used in putting on the stainless steel bushing. Note: The universal kit for the 5 lug/ 3500lb has 3 shims. The universal kit for the 6 lug/ 5200 and the 8 lug 7000lb has 1 shim. One of (2) things will happen:
- Air-Tight's stainless steel bushing will fit your spindle snug, without the use of a shim.
- One of the (3) shims will fit your spindle snug so Air-Tight's stainless steel bushing can bond directly on top of the shim.
- 1. If there is a stainless steel sleeve on your axle, you must remove it. Removal can be accomplished by carefully splitting the bushing in half, using a hammer and a thin tip screwdriver. Exception: If your axle is made by U.F.P. (Unique Functional Products) (Check your trailer manufacture with Cross Reference Chart to see if your mfg. is U.F.P.) the bushing does not have to be removed due to their bushing is sealed to the spindle. If you are not sure which axle manufacturer you have, go to our web site, which lists over 70 trailer manufacturers and the axles they use or match it up to the spindle in the pictures on the Illustrated Universal Bushing Assembly Sheet.
- If the spindle is a drilled spindle, look to see where the
grease hole is located on the spindle. If the grease hole is not on or through
the edge of the bearing journal of the spindle, then to simplify the installation
of the bushing, simply drill into the grease hole with a 3/16 “ drill
bit about 1/4 “ in and open the hole into the bearing journal. This
will eliminate driving the bushing back further on the spindle to leave the
grease hole open. Remove any burrs caused by the drilling with a file prior
to putting on the shim and or bushing. Draw a straight line through the grease
hole to the back of the spindle with a permanent marker. This will mark the
location of the grease hole. Match one of the shims to your spindle. The shim
that fits the closest is the shim you will bond to the spindle.
Note: If Air-Tight's stainless steel bushing fits on the spindle the closest, the shims are not needed. - Clean any corrosion on the axle with emery cloth and wipe clean with a degreaser. Clean the inner dimensions of the shim with a degreaser.
- Shake up the bonding agent by removing the cap, cut the tip with a razor knife and screw the cap back on. Squeeze the container a few times back and forth. This will mix the bonding agent so that it is thick and consistent and easy to apply. Put the bonding agent 360 degrees on the axle where the shim will go and 360 degrees on the inner dimensions of the shim.
- Put the shim on the spindle. Even if the shim goes on by hand, use an old inner bearing and a short pipe or punch and tap on the bearing until the bearing bottoms out. Remove the bearing. This will form the shim to the contour of the spindle and put the shim back against the shoulder. The shim will block the grease hole on the spindle. Use an awl or a nail to pierce through the shim where you marked the hole, leaving the grease hole open.
- Bond Air-Tight's stainless steel bushing on the top of the shim the same way you put on the shim. If you had to press on the bushing with an old bearing, when the bearing bottoms out, remove the bearing and use a brass or aluminum punch to place the bushing in against the shoulder. Tap on the taper of the bushing on both sides until the bushing is against the shoulder If there is no shoulder, tap the bushing about 1/16 of an inch in from the inner bearing. Air-Tight's stainless steel bushing should always be about 1/16 of an inch back from the inner bearing when placed properly.
- Be sure to remove any debris in the grease hole. Removal of the debris can be done by greasing the zerk fitting and letting the grease clean out the hole.
- When the bushings are assembled, discard the remaining shims and continue with the main directions.
| 4. Disassemble wheel: |
Back To Top |
- Jack up trailer and remove wheel
- Pull hub off axle
| 5. Cleaning the axle: |
Back To Top |
- Clean the axle and the inner dimensions of the bushing with a degreaser.
- Be sure to use a degreaser that is approved for cleaning metal in your area. Today we will be using Lacquer Thinner.
- Whichever degreasers you use, make sure it cleans the metal thoroughly of all grease.
- Sand down the surface with emery cloth until the surface is clean of most surface corrosion.
- Clean again with a degreaser. Make sure the surface is grease free. There is no such thing as being too clean!
| 6. Applying the bonding agent: |
Back To Top |
- Shake up the bonding agent by removing the cap, cut the tip with a razor knife and screw the cap back on. Squeeze the container a few times back and forth. This will mix the bonding agent so that it is thick and consistent and easy to apply.
- Put the bonding agent 360 degrees on the axle where the bushing goes and 360 degrees on the inner dimensions of the bushing.
| 7. Putting on the bushing: |
Back To Top |
- Put the bushing on the axle with the taper towards the outside. Bushings may go on by hand or you may have to tap the bushing on with an old inner bearing and a short pipe.
- Tap the bushing on the axle against the shoulder. If there is no shoulder, tap the bushing on where the seal will ride 100% on the surface.
- Indicating where the old seal was riding is the best way of placing the bushing. The rule of thumb is about 1/8 of an inch in from the inner bearing. That will leave open the grease hole if the axle is a drilled spindle.
- If the bushing has to be driven on with an old bearing, then once the bearing bottoms out on the spindle, remove the bearing and use a brass or aluminum punch to place the bushing in that 1/16 of an inch. You want to tap on the taper part of the bushing.
- If the axle has a "Sure Lube" system, which has a hole drilled through the back of the spindle, the hole has to be drilled and tapped to 1/8 inch N.P.T.
- If there are any obstructions to drilling and tapping the hole, simply use a die grinder and remove the obstruction.
- Use cold galvanized spray to touch up any bare metal.
- Once tapped, grease can be pumped through the hole where the seal rides to back flush the old grease and metal shavings out of the back of the spindle.
- Once flushed, put Teflon tape on the zerk fitting and tighten.
- We use a sealable zerk fitting to hold back the air pressure 100%. Part Z-100.
- The spindle can be greased through the back end into the hub.
| 8. Loosen the Zerk fitting: |
Back To Top |
- If you are putting on Air-Tight's Sport Model, the zerk fitting does not have to be removed.
- If the zerk fitting is countersunk in the end of the spindle, it does not have to be removed.
- If the zerk fitting is pressed in, tap on each side with a blunt chisel until the zerk is removed. Save the zerk, because it will be used to grease the hub.
- If the axle has the "Easy Lube" system, loosen the zerk fitting in the end of the spindle.
| 9. Prepare the hub: |
Back To Top |
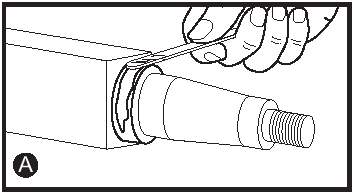
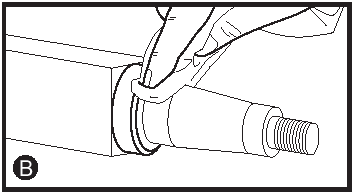
- Remove the old seal and check the bearings and races.
- Replace bearings and races if there is any damage.
- Clean out the old grease from the hub.
- If the spindle is drilled, put the inner bearing in the hub dry. Clean the hub where the seal is pressed in with a degreaser and apply bonding agent 360 degrees on the hubs inner dimensions and apply bonding agent 360 degrees on the seal's outer dimensions.
- Press the seal into the hub flush with the hub. Make sure the seal is started evenly, about 1/8 of an inch into the hub before it is driven in all the way. You should use a seal driver or press for putting in the seals. It is important to note that the seals tend to start in the hub unevenly. Tap on the seal driver just to start the seal and then tap on the high end of the seal driver to get the seal started evenly. Once the seal is started evenly, drive the seal in flush with the hub. That will place the seal 100% on the bushing and true the seal with the hub.
- If the spindle is not drilled, put the inner bearing into the hub packed with grease. Wipe out any grease that is on the inner dimensions of the hub where the seal is pressed in. Clean the surface with a degreaser until it is completely clean of all grease. Next, apply bonding agent to the hub I.D. and the seal O.D. Press in the seal until the seal is flush. Make sure to press in the seal evenly. Wipe off excess bonding agent, and pack the cavity between the seal and the inner bearing with grease. Make sure the cavity is full. Next, pack grease into the middle of the hub, between the two races.
| 10. Assemble the hub: |
Back To Top |
- Put on the hub. If the axle is not drilled, then put the outer bearing in packed with grease. If the axle is drilled, the outer bearing can be put on dry.
- Put on the washer and nut. Tighten the nut to seat the bearings. Put the retainer on the nut.
- If you are putting a hub on with a cotter pin in the axle, you must bend the cotter pin tight against the axle for clearance on the Air-Tight cap.
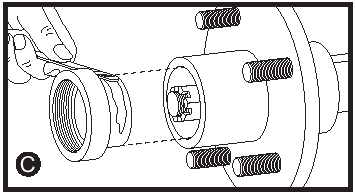
| 11. Put on adapter ring: Photo C |
Back To Top |
- Clean the surface where the adaptor ring is pressed on. This can be done by wiping the excess grease off while turning the hub 360 degrees around.
- Next, use the degreaser to wipe the hub off where the adaptor ring will be pressed in. Make sure all the grease is cleaned off.
- Then place bonding agent 360 degrees around the edge of the hub and the outer face of the hub. This can be done by turning the hub around while applying bonding agent.
- Place the bonding agent on the adaptor ring collar, 360 degrees around.
- With a soft-faced tool, or block of wood, drive the adaptor ring into the hub.
- Wipe off excess bonding agent.
- Grease the hub through the zerk fitting until grease comes through the outer bearing.
- Remove the zerk fitting on the end of the spindle unless it is countersunk or you are putting on the Sport model. The zerk fitting is only removed for clearance on the Commercial models pressure cap.
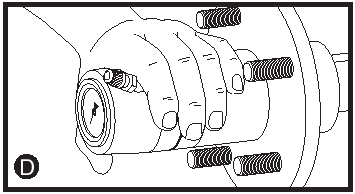
| 12. Install Air-Tight Cap: Photo D |
Back To Top |
- Put grease on the "O" ring and the threads on the cap.
- Screw the cap in the adaptor ring by hand, compressing the "O" ring. Hand tightening is sufficient.
- Release any air pressure through the valve stem that may have been created by screwing in the cap.
- If you are installing the Sport model, apply bonding agent to the hub and sports cap the same way as the Commercial model's adaptor ring.
- Drive the cap in with a block of wood.
- Grease the hub through the zerk fitting, put grease on the grommet of the diaphragm and put in the rubber diaphragm.
| 13. Allow the Bonding Agent to Fully Cure and air up the Hub:: |
Back To Top |
- Let the entire assembly cure for 24 hours before submerging it in water, in order to allow for proper setup of the bonding agent.
- On the Commercial model, when the bonding agent is cured, use a manual air pump such as a bicycle pump and put in 15 pounds. Remove the pump and bleed the valve stem until the gauge reads 10 p.s.i.
- After the initial trip you may have to pump the hub back up to 10 p.s.i due to the air pockets in the grease equalizing to the 10 p.s.i. Put grease on the valve stem and replace the valve stem cap. Replace the valve stem cap.
- DO NOT PRESSURIZE OVER 30 PSI!!
- On the Sport Model, use a manual pump with a sports needle, put grease on the sport needle and insert it into the center of the diaphragm. Pump up until the ridges in the diaphragm protrude outwards.
- Diaphragm should protrude out past the cap approximately 3/4 of an inch. That will pressurize the hub with approximately 5 to 10 psi.
- DO NOT OVER PRESSURIZE THE DIAPHRAGM!!
- Your indicator of a pressurized hub is by visually seeing where the diaphragm position is relative to the face of the cap.
- For example, if the diaphragm protrudes out greater than 1 inch, the V's between the rings on the diaphragm will begin to flatten out and the pressure will be greater than 10 psi.
- So, ideally, the diaphragm should be inflated approximately 3/4 of an inch past the cap.
- If the diaphragm's rings and face are compressed against the cap, it is time to pump the diaphragm out to approximately 3/4 of an inch.
- Remember; lubricate the sport needle with grease whenever you inflate the diaphragm.
| 14. Ready to go!: |
Back To Top |
- Your Air-Tight Bearing Protector will protect the grease and let the grease do its job. And I think you will agree, it's not only easy to install, it's simply the best bearing protection of it's kind available.
- Air-Tight protects hubs from contaminates as well as the water.
- It quickly indicates a bearing problem or seal failure.
- And it's an environmentally friendly, clean system; the grease stays in, keeping trailers, brakes and the waterways clean.
- That's why Air-Tight Bearing Protectors are considered "Environmentally Friendly" and the "Best Bearing Protectors" you can buy.
- Congratulations, you are now good to go!
| Tips on the Installation: |
Back To Top |
- Your Air-Tight hub kit is designed to last a long time. The wear parts are the seal and eventually the bushing, depending on the severity of the environment and mileage. In the meantime, with proper installation, you should experience thousands of miles out of each seal. When air pressure can no longer be maintained you will see a loss of air pressure on the gauge.
- Air-Tight tells you when it's time to change seals and repack bearings. If pressure is equal to or less than 5 p.s.i., add pressure to 10 p.s.i.. At the end of the seal life, there will be a gradual increase in air pressure leakage out of the hub. When you can no longer hold air pressure statically, this means that it's time to change the seal and repack the bearings. If you discover this loss of air pressure while on a trip, air up the hubs (using a bicycle pump do not use a motorized/auto air pump) to 10 p.s.i. before submerging in water.
- The Air-Tight gauge will warn you of potential problems prior to hub failure. During a trip while stopping for fuel or launching a boat at a ramp, quickly check the pressure gauges. If the p.s.i. on departure was 10 p.s.i., you should experience a pressure increase of 1-1.5 p.s.i. in normal conditions due to the heat buildup. If a gauge is abnormally higher (3 p.s.i. or greater), there may be a brake dragging or a future bearing problem creating extra heat.
- Maximize your seal's life. Do not over pressurize the hub (never inflate to 30 p.s.i. or greater). Ideal pressure for protection and maximum life of the seal is 10 p.s.i. Do not use a motorized or auto tire pump to pressurize the Air-Tight Bearing Protector. Use a hand powered bicycle type pump for the minimal amount of air you will need.WARNING: OVER-PRESSURING HUB CAN LEAD TO GAUGE BREAKAGE
- Temperature change will also change pressure. Colder air temperature will lower the p.s.i. slightly and hotter temperatures will increase the p.s.i. slightly. In a short time, you will know what your pressure will run in a given situation, depending on trip duration, ambient temperature, and your typical environment.
- You will enjoy the ability to monitor what is going on inside your hubs at all times. The purpose of this product is to eliminate time spent on the roadside doing time intensive and unnecessary repairs. Consider it insurance for your investment!
- Air Tight recommends changing the seal and re-packing bearings when the seal no longer statically can hold pressure.
- Loosen cap slightly, tap on cap 360 degrees around with rubber mallet or soft faced tool until adapter ring comes off. (Removal of adapter ring is only necessary when removing hub for repacking and seal change.)
- When you can no longer statically hold air pressure in your hubs , Air-Tight recommends that you repack your bearings and change your seal.
- Trailers operating under extreme conditions can add grease to the bearings after 1 year. Do this by releasing the air pressure in the cap and unscrewing the cap off the adaptor. Note: (If the cap is tight, use a rubber strap filter wrench to loosen). On the axle where the zerk fitting was removed, screw in a zerk fitting if the spindle was tapped or place a zerk fitting on the end of a grease gun and press the fitting by hand against the hole in the axle. Add grease until the new grease comes through the outer bearing. Wipe off excess grease. Remove the zerk fitting. Replace the cap and add 10 psi. Extreme conditions mean : High mileage annually and running a trailer load near total gross vehicle weight rating.
- If the hub has a tang washer, our 1 1/2" special socket can take the hub off without a removal of the adaptor ring.
- If the axle has a cotter pin, you must remove the adaptor ring to pull out the cotter pin. When finished, the adaptor ring can be bonded back in with a green retaining compound such as locktight. Again, make sure the surface is clean before using the bonding agent.
- Disconnect the trailer wire harness from the truck when submerging your trailer. This will eliminate hot light bulbs going into cool water and electrolysis coming from the 12 volts which can attack your trailer in salt water.


Defense Logistics Agency
Cage Code: 48CF5